
Photo by the editor
# Entry
You probably already feel like we’re in a up-to-date era of agent-first AI and developers are turning to up-to-date tools that, rather than just reactively generating code, truly understand the unique processes behind code generation.
Google antigravity has a lot to say on this matter. This tool is the key to creating highly customizable agents. This article explores some of its potential by explaining three basic concepts: principles, skills, and workflows.
In this article, you’ll learn how to combine these key concepts to build more strong agents and proficient automated pipelines. Specifically, we will walk you through a step-by-step process of configuring your Code Quality Assurance (QA) agent workflow based on specific principles and skills. Let’s go!
# Understanding three basic concepts
Before we get our hands grubby, it’s helpful to break down the three elements of the Google Antigravity ecosystem:
- Rule: These are the fundamental constraints that dictate how the agent behaves, as well as how it adapts to our stack and fits our style. These are stored as markdown files.
- Skill: Think of skills as a reusable package of knowledge that instructs an agent how to perform a specific task. They are placed in a dedicated folder containing a file called
SKILL.md. - Workflow: These are the orchestrators who put it all together. Workflows are invoked using command-like statements preceded by a slash, e.g
/deploy. Simply put, workflows guide an agent through a roadmap or trajectory that is well-structured and consists of multiple steps. This is the key to automating repetitive tasks without losing precision.
# Taking action
Let’s move on to our practical example. We will see how to configure Antigravity for review Python code, apply appropriate formatting and generate tests – all without the need for additional third-party tools.
Before following these steps, make sure you have first downloaded and installed Google Antigravity on your computer.
Once installed, open the desktop application and your Python project folder – if you’re up-to-date to this tool, you’ll be asked to define a folder on your computer’s file system to act as your project folder. Regardless, the way to add a manually created folder to Antigravity is to apply the “File >> Add Folder to Workspace…” option in the top menu toolbar.
Let’s assume you have a up-to-date, empty workspace folder. In the root of your project directory (on the left), create a up-to-date folder and give it a name .agents. Inside this folder we will create two subfolders: one called rules and one named skills. You can guess that in these two cases we will define two pillars of our agent’s behavior: rules and skills.
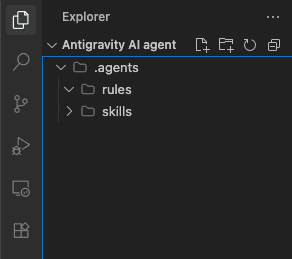
Project folder hierarchy | Photo by the author
First, let’s define a rule that contains our basic constraints that will ensure the agent complies with Python formatting standards. We don’t need detailed syntax for this: in Antigravity we define it using clear instructions in natural language. Inside rules subfolder, you will create a file called python-style.md and paste the following content:
# Python Style Rule
Always apply PEP 8 standards. When providing or refactoring code, assume we are using `black` for formatting. Keep dependencies strictly to free, open-source libraries to ensure our project remains free-friendly.
If you want to do this, go to the agent customization panel that activates on the right side of the editor, open it, find and select the rule we just defined:

Customize Agent Rule Activation | Photo by the author
Customization options will appear above the file we just edited. Set the activation model to “globe” and specify this globe pattern: **/*.pyas shown below:
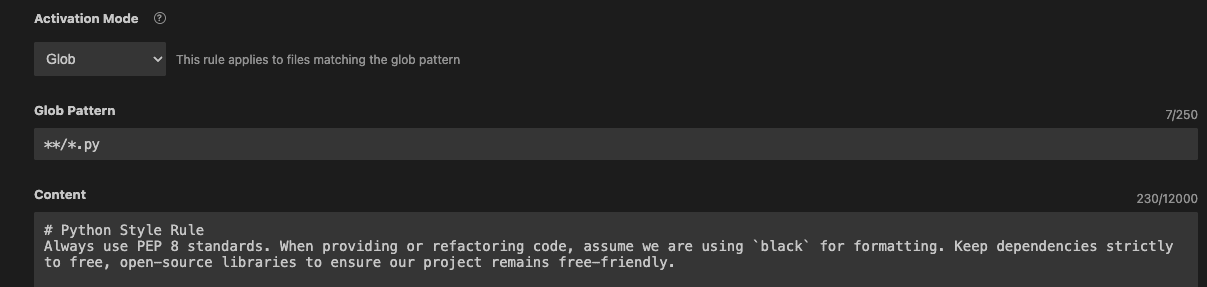
Setting Global Activation Mode | Photo by the author
This ensures that the agent you run later will always apply the rule you defined while working on your Python scripts.
Then it’s time to define (or “teach”) the agent some skills. This will be the ability to perform strong testing of Python code – something extremely useful in today’s demanding software development environment. Inside skills subfolder, we will create another folder called pytest-generator. Create SKILL.md it contains a file with the following content:
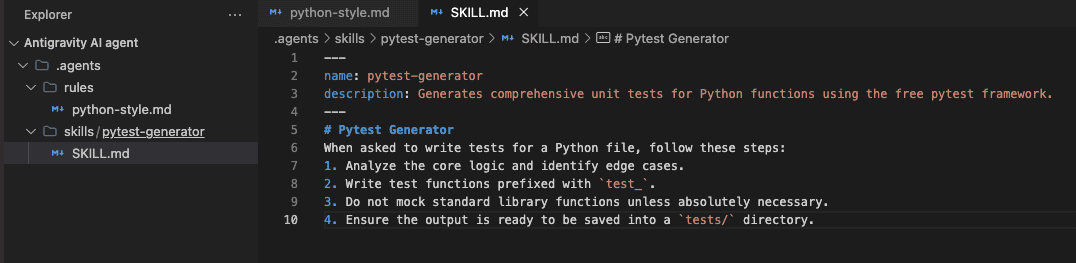
Defining agent skills in the workspace | Photo by the author
Now it’s time to put everything together and run our agent, but not without having a sample Python file of “poor quality” code in the project workspace to try it all out. If you don’t have them, try creating a up-to-date one .py file, calling it something like flawed_division.py in the root directory and add this code:
def divide_numbers( x,y ):
  return x/y
You may have noticed that this Python code is intentionally messy and buggy. Let’s see what our agent can do with it. Go to the customization panel on the right and this time focus on the “Workflows” navigation panel. Click “+Workspace” to create a up-to-date workflow that we will invoke qa-checkwith the following content:
# Title: Python QA Check
# Description: Automates code review and test generation for Python files.

Step 1: Review the currently open Python file for bugs and style issues, adhering to our Python Style Rule.
Step 2: Refactor any unproductive code.
Step 3: Call the `pytest-generator` skill to write comprehensive unit tests for the refactored code.
Step 4: Output the final test code and suggest running `pytest` in the terminal.
All these elements, glued together by the agent, will transform the development loop as a whole. With the Python file still open in the workspace, we will launch our agent by clicking the agent icon in the right-hand pane and typing qa-check command and pressing Enter to start the agent:

Invoking a QA workflow via the agent console | Photo by the author
Once executed, the agent will correct the code and automatically suggest a up-to-date version in the Python file as shown below:
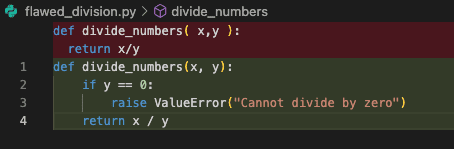
Refactored code suggested by agent | Photo by the author
But that’s not all: the agent also provides the end-to-end quality control we were looking for by generating a number of code snippets that can be used to run various types of tests using pytest. To illustrate, this is what some of these tests might look like:
import pytest
from flawed_division import divide_numbers

def test_divide_numbers_normal():
    assert divide_numbers(10, 2) == 5.0
    assert divide_numbers(9, 3) == 3.0

def test_divide_numbers_negative():
    assert divide_numbers(-10, 2) == -5.0
    assert divide_numbers(10, -2) == -5.0
    assert divide_numbers(-10, -2) == 5.0

def test_divide_numbers_float():
    assert divide_numbers(5.0, 2.0) == 2.5

def test_divide_numbers_zero_numerator():
    assert divide_numbers(0, 5) == 0.0

def test_divide_numbers_zero_denominator():
    with pytest.raises(ValueError, match="Cannot divide by zero"):
        divide_numbers(10, 0)
This entire sequential process performed by the agent involved first analyzing the code under the constraints we defined using rules, and then autonomously invoking the newly defined skill to create a comprehensive testing strategy tailored to our code base.
# Summary
Looking back, in this article we showed how to combine the three key elements of Google Antigravity – principles, skills and workflows – to turn general agents into specialized, reliable and proficient contributors. We showed you how to make your agent specialize in properly formatting messy code and defining QA tests.
Ivan Palomares Carrascosa is a thought leader, writer, speaker and advisor in the fields of Artificial Intelligence, Machine Learning, Deep Learning and LLM. Trains and advises others on the apply of artificial intelligence in the real world.